Turn Any Image to 3D Print Model – Step-by-Step Guide
Want to turn an Image to 3D Print? Whether you’re designing a custom 3D-printed keychain, an engraved logo, or a personalized tag, this step-by-step guide will show you how to transform any 2D image into a 3D printable model using Inkscape, Fusion 360, and Bambu Studio.
📺 Watch the full tutorial here:
How to Convert an Image to 3D Print (Quick Steps)
✅ Step 1: Choose or generate an image
✅ Step 2: Convert the image to SVG format
✅ Step 3: Create a 3D model in Fusion 360
✅ Step 4: Prepare and print in Bambu Studio
✅ Step 5: Finish and review your 3D print
Let’s get started!
Step 1: Choose or Generate an Image for 3D Printing
To successfully convert an image to a 3D print, you’ll need a high-contrast image that works well for 3D modeling. The best images for this process include:
✔ Silhouettes or icons
✔ Logos and symbols
✔ Simple high-contrast designs
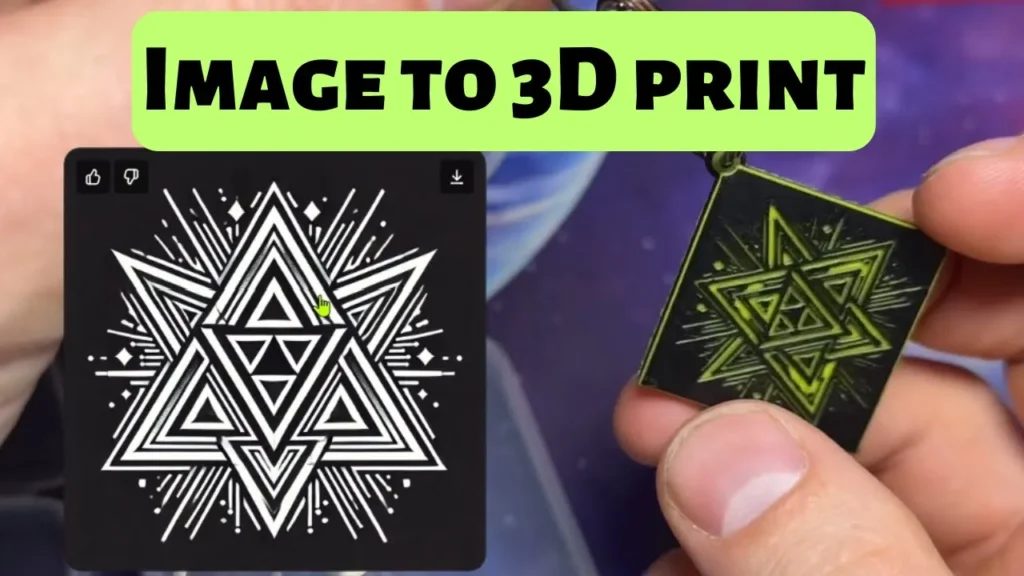
For this tutorial, I used ChatGPT to generate a unique Triforce-inspired image. If you’re creating an image from scratch, make sure it’s clean and easy to trace.
Step 2: Convert the Image to SVG Format in Inkscape
The SVG file format is crucial when you convert an image to a 3D print, as it allows your image to be transformed into a vector-based design for 3D modeling. Here’s how:
- Open Inkscape and import your image.
- Resize and position the image correctly (use Ctrl + Shift to keep proportions).
- Click Path > Trace Bitmap to create an SVG.
- Use Brightness Cutoff for best results.
- Adjust sliders to remove extra details.
- Click Apply and export as an SVG file.
💡 Pro Tip: Hold Alt + Arrow Keys to fine-tune image placement.
Step 3: Convert the SVG to a 3D Model in Fusion 360
Once you have an SVG file, the next step is to convert the image to a 3D print by turning it into a 3D model using Fusion 360.
- Open Fusion 360 and create a base shape (e.g., a rectangle for a keychain).
- Add a small hole for attaching to keychains.
- Import the SVG file and place it on the base.
- Rotate and scale the design to fit.
- Use the Extrude (E) tool to raise or engrave the image.
- Export the model as an STL or STEP file for 3D printing.
Step 4: Prepare the Model in Bambu Studio
With the 3D model ready, you can now convert the image to a 3D print in Bambu Studio:
- Open Bambu Studio and import the STL file.
- Adjust depth, size, and rotation as needed.
- Use the Layer Height Tool to apply multi-color printing.
- Slice the print and review the layers.
- Click Send to Printer to start printing!
💡 Using a 0.2mm nozzle will help retain fine details!
Step 5: Review Your Final 3D Print
After printing, you now have a custom 3D print from an image! This method works great for:
✔ Custom gifts 🎁
✔ Engraved logos 🏢
✔ Personalized keychains 🔑
📢 Watch the full tutorial on YouTube!
👉 Click here to watch
Why Convert an Image to 3D Print?
✅ No advanced design skills needed – Easily convert any image to a 3D model.
✅ Great for logos, keychains, and custom designs – Perfect for personalization.
✅ Works with various software – Use Inkscape, Fusion 360, and Bambu Studio.
🚀 What would you 3D print using this method? Drop a comment below! 👇
Also be sure to check out some of our other blog posts here.


